Bullion Rounds - More than you ever....
 ...wanted to know.
Back in January when I was preparing to teach freeform crochet at a daylong retreat, I decided I wanted to devote some workshop time to the bullion stitch. Many freeform crocheters use it extensively, some not at all, but it's a stitch that adds texture and sometimes movement to a piece and is certainly worth learning. At this time, I tend to use it sparingly and less in rounds than in clusters of it here and there. But I reserve the right to change that tendency at any time!
It's a difficult stitch to learn and requires practice to achieve co-ordination between all the
 elements involved: wrapping yarn numerous times around the hook, keeping the proper tension, and manuevering the wraps so that one can pull a loop through all the wraps smoothly. I vividly remember sitting in my LYS wondering if I would ever be able to do this stitch, and pretty much deciding I would be a bullion stitch-less freeformer.
Eventually (I think after reading Prudence Mapstone's explanation in one of her books and doing something just a little differently) I had a total Whoo-Hoo! moment. One minute I was completely inept with this stitch and the next I was able churn them out, to "swoop" the stitch. Swooping bullions means one is able to draw the picked up loop through all the wraps in one fell swoop. I can now make a bullion with pretty much any yarn and any hook, though my favorite yarn to do them is a relatively smooth singles or non-splitty plied yarn and my favorite hook to do them with is my favorite working hook - Clover SoftTouch.
This post is mostly for those who already have a working knowledge of the bullion stitch (also called roll stitch.) If you don't and would like to learn, there are tutorials online with good photographs and there are videos. Here is one by Margaret Hubert to get you started:
http://www.youtube.com/watch?v=ciaJwMW3Wys
As started making some bullion rounds for the workshop, so that I could have some examples, I discovered something that fascinated me. There are two distinct ways to make bullion rounds (and two combinations of each that actually make four ways.)
I started noticing that when I made bullions using the directions from Prudence Mapstone and Renate Kirkpatrick, my rounds were smaller, more raised - like little Bundt cakes. When I used directions from other designers and from directions in vintage books, my bullion rounds were larger and flatter. I decided to refer to the latter as Traditional (on the left below) and the former as Modern (on the right.)

the backs:
 These rounds were made with the same yarn, same hook, same number of wraps, same number of bullions but you can see that there are significant differences. In addition to differences in diameter and height, the bar from the final locking stitch lies differently - in the Traditional, it tends to nestle between the bullions and in the Modern it lies against the back center of the bullion.
The point is not that one is the "right" way to do the bullion stitch or that one is superior. The point is that we can consciously choose one way or the other to achieve a different effect.
Here are my written instructions for each type, using only 5 wraps (you can, of course, use many more)
:
#1 - Traditional
Right side facing
There is one loop on hook
Wrap yarn around hook 5 times
Insert hook in fabric, draw a loop through
Yarn over hook, draw through wraps and the original loop, leaving 1 loop on hook.
Yarn over hook, draw through remaining 1 loop.
#2 - Modern
Right side facing.
There is one loop on hook.
Wrap yarn around hook 5 times.
Insert hook in fabric, draw a loop through
Draw this loop through all wraps, leaving 2 loops on hook
Yarn over hook and draw through remaining 2 loops.
As you can see, the difference lies in the last two steps, in either doing a yarn over or not, and in how many loops you have on the hook before your final locking stitch.
If that wasn't more than you ever wanted to know about bullion rounds, this should do it for you:
The third and fourth variations come about from combining those differences...i.e.:
#3
Right side facing.
There is one loop on hook.
Wrap yarn around hook 5 times.
Insert hook in fabric, draw a loop through
Yarn over hook, draw this loop through all wraps, leaving 2 loops on hook
Yarn over hook and draw through remaining 2 loops.
#4
Right side facing
There is one loop on hook
Wrap yarn around hook 5 times
Insert hook in fabric, draw a loop through
Draw through wraps and the original loop, leaving 1 loop on hook.
Yarn over hook, draw through remaining 1 loop.
Fronts of the four variations of bullion rounds:
 Top: Traditional, Modern
Bottom: Combo #3, Combo #4
Backs of the four variations of bullion rounds:
Backs of the four variations of bullion rounds:
 Top: Traditional, Modern
Bottom: Combo #3, Combo #4
Sides of the four variations of bullion rounds:
 Left to right: Traditional, Modern, Combo #3, Combo #4
and I think that's all I have to say on this subject!

Sides of the four variations of bullion rounds:
 Left to right: Traditional, Modern, Combo #3, Combo #4
and I think that's all I have to say on this subject!

Labels: bullion stitch, freeform crochet
posted by 'Zann @ 11:46 AM
![]()

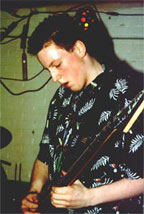

 Patrick's dad, Paul Burkett, took up saxophone 6 months after Patrick died, making our garage 'Patty's Studio'and making music his healing path.


3 Comments:
Thanks! That was great to see pictures of the differences between the four variations. Love it!
Hi, I found your post when searching the web for images of bullion crochet. Nice experiment! Thank you for sharing. I linked your post to my today's post with some notes in Japanese. http://doily.exblog.jp/15706116/ (I love bullion stitch!)
Glad you enjoyed the experiment - it was fun to do and has proved useful for me. Hope others find it useful as well!
Post a Comment
<< Home